Changelog
Follow up on the latest improvements and updates.
RSS
We now offer the ability to search for an order based on the last four digits of the card used to make the purchase. This new tool allows you to efficiently find an order so you may add an email address or person record to the order, initiate a transfer, exchange tickets, or issue a refund. This is particularly handy for orders where the customer name or email address is unknown, including box office and box office app orders where the customer did not provide an email address, rush pay orders, or online guest checkout.
This search tool is available in the Orders section of each event bucket and in your Global All orders page. Launch the search by clicking the button that says "Search by card last 4"

For more information, please see our new Help Article, "Search for an order using the Last 4 Digits of the Credit Card Number."
new
improved
The Membership Module
Our new membership module gives you more control.
Eventive has always offered robust membership management tools using pass buckets. Now memberships have their own space on your dashboard in the new membership module.
With the Eventive membership module, you can now create membership options and track member data separately from passes using Membership Sales Analytics, Membership Ticket Analytics and Membership Status Analytics.
The membership module:
• Allows you to create and maintain memberships and member data in a new dedicated section on your Eventive dashboard.
• Creates a membership sales page on your Eventive native site, separate from your pass sales page.
• Comes with its own set of analytics that allows you track membership sales, renewals and redemption trends separately from pass sales and redemptions.
Whether you already host memberships through Eventive or would like to add this important feature, all you have to do to start is go to your event bucket settings > site features > toggle on ‘membership module enabled.’

You only need to enable the membership module in one of your event buckets. Benefits will be applied across all your event buckets using global membership rules.
Any existing memberships currently hosted in the pass buckets section as recurring passes may be easily migrated to the membership module by going into ‘general’ pass bucket settings > advanced > clicking ‘Migrate pass bucket to membership.’

Check out our extensive collection of guides on how to set up your memberships in the Help Center.
You can also book a special
15 minute office hours meeting
with a member of our Customer Success Team to talk over questions!Membership tips and best practices
Use these ideas as you build out your new or existing membership program:
- Host memberships in one event bucket. Typically it is best to host them in the event bucket where you create and promote your year-round programs. This way, all data and management remains continuous from year to year.
- Routinely clean up membership rules once they’re no longer in use, this saves confusion amongst seasonal staff and allows for quicker loading of rules.
- Offer quantity price breaks and dual memberships for multiple purchases.
- Drive interest and year-round revenue with special sales or exclusive offers.
- Enable Gift Membership, it’s a great way to encourage year-round gifting. In your general membership settings, click “allow memberships to be purchased as gifts.”
NOTE:
You are not required to activate the membership module right away. In fact, you do not have to migrate existing memberships until you are ready - or ever! While this upgrade is an improvement to our membership offerings, it does not affect current functionality. However, the Membership Module provides the added benefit of being able to build, sell and analyze the performance of your membership program separately from any other pass product(s) that you are offering.
To improve admin user experience when working with multiple pass rules in a pass bucket, we have added a streamlined
summary display for each pass rule
, along with the option to name your pass rules
.In addition to the previously existing options for pass rule functions, we've added a customizable Rule Name field that you can use to identify your pass rules at a glance.
Use the Rule Name field to describe what your pass applies to and what the rule is meant to do. This will help you organize and curate the rules for your passes and memberships so that they are ordered properly an apply to your current events, screenings and items. Adding meaningful and descriptive pass rule names will also help with pass rule troubleshooting.

To simplify access to pass rule auditing and editing, we have changed the display of pass rules within pass bucket settings. Instead of seeing every pass rule editor fully open on the pass rules page, you will see a summary display that includes a listing of the key functions of the pass, along with the Pass Rule Name.
To open an existing pass rule for editing or expanded viewing, you'll simply click the
EDIT
button on the summary view, then save (or simply close if there are no changes) when finished. Editing the pass rules individually
and displaying a summary of each pass rule
along with a pass rule name
on the pass rules settings page will make it easier to get an overview of multiple pass rules, prevent accidental editing of the wrong pass rule and help improve load time for the pass rule editor in cases where there is a large number of pass rules targeting across multiple event buckets. 
For more information on recent updates to pass rule creation please refer to the following articles:
new
Audience Experience
Apple Pay & Google Pay now available for physical event ticketing
We’ve updated our physical event and pass checkout payment options to match virtual event payment options.
Of note, the upgraded payment pathway now supports Apple Pay and Google Pay.
When using a compatible browser on a supported device that has Apple Pay or Google Pay configured properly, customers will be presented with the option to pay using Apple Pay or Google Pay at Checkout.
Apple Pay should be visible in Safari on a Mac, iPad or iPhone.

Google Pay should be visible in Chrome on Android devices that support Google Pay.

Other payment methods that are now available with the Unified Payment Pathway include; iDeal, Bancontact and P24. Please note that some payment methods (like iDeal) are regionally specific and require the use of a specific currency as your primary currency. For more information on additional payment methods, please reach contact our support team from your Eventive Dashboard.
new
improved
Hide Tags from Public View
Tags have always been useful for classifying and sorting your films and screenings. They help your customers navigate your schedule, film guide and virtual catalog. Tags have also been great for tabulating ballots in smaller groupings for specific competitions.
The uses for tags on Eventive are ever growing, particularly in the areas of data-driven decision making and CRM/marketing integrations.
This new feature allows you to hide selected tags from your Eventive native site. Now you can create tags for strictly internal uses and those tags will not appear on your schedule or on your film guide.
A tag can be hidden by going to the tag manager section of your admin dashboard and selecting "Hide tag from public views"
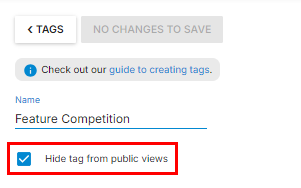
NOTE: If a tag that is hidden from public views is used as a display section on the Virtual Catalog, the display section will still be visible to your audience. If you are interested in controlling the visibility of your display sections and virtual screenings, please reach out to Eventive support and ask about controlling visibility by pass type.
improved
Archive Event Bucket
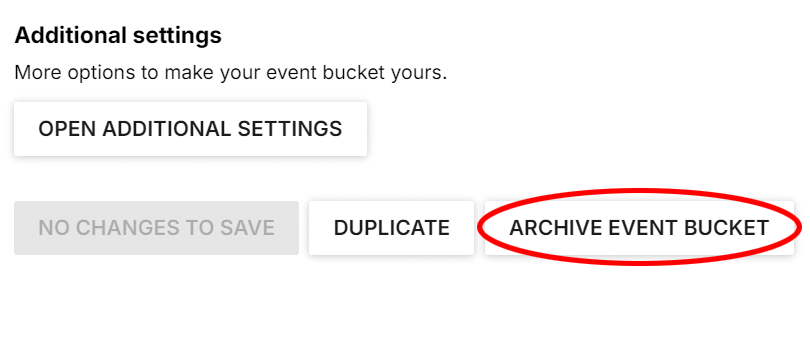
To help you keep your Eventive dashboard organized and easy to use, we’ve added an “Archive Event Bucket” button in place of the “Delete Event Bucket” button in your Event Bucket Settings.
When you archive an event bucket, all sales in that event bucket are automatically disabled and all events, pass buckets, financial data, setup and configuration are preserved so that you can easily duplicate event buckets to create the framework for any future events.
Archived event buckets are moved into the archive section of your dashboard, and can be accessed at any time by clicking on the archive section in the sidebar. They will no longer appear in the Eventive Scanner event bucket selector.
You can unarchive as needed using the “event bucket mode” option in settings, as well as all the other functions that were previously available in that section.
What if I really need to delete an event bucket?
Event buckets can be deleted by submitting a request for event bucket deletion via Eventive Support Chat by clicking the blue chat icon in the bottom right corner of your Eventive Dashboard. You may be asked to confirm your reason for deleting an event bucket.
Should you choose to delete an event bucket, and you change your mind for any reason, you may only do so up to 14 days from the day of deletion and restoring a deleting an event bucket is subject to a fee.
For more information regarding best practices around Festival Wrap up, please check out this Tips & Tricks article.
improved
new
Bulk Actions
To save you time in the dashboard when circumstances change, we've added new bulk action options.
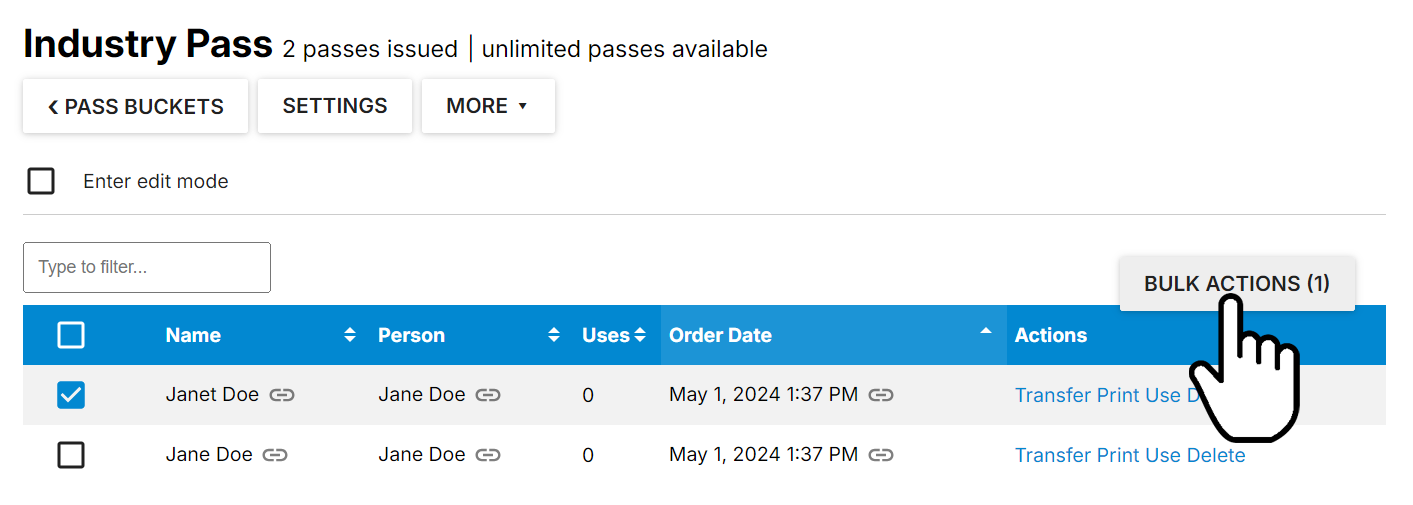
The 'Bulk Actions' button will allow you to apply an action to one or more tickets or passes at a time.
Available bulk actions include:
- refund
- mark ticket as scanned
- delete
- change
- exchange
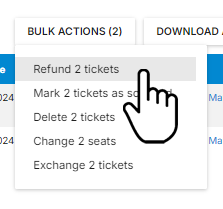
This button will appear above the top right corner of ticket tables and pass tables throughout your Eventive dashboard when you have selected one or more tickets or passes using the checkboxes on the left side of a ticket table or pass table.
For Tickets, you can access this button from the customer profile, from an order, or from the Ticket listing for any physical event or virtual screening.

For passes, you can access this button from the customer profile, from an order, or from any Pass Bucket view.
For more information on bulk actions and how they work, please visit these recently updated help articles:
Eventive Organizers now have two great options for previewing your mailings before sending them to your audience.
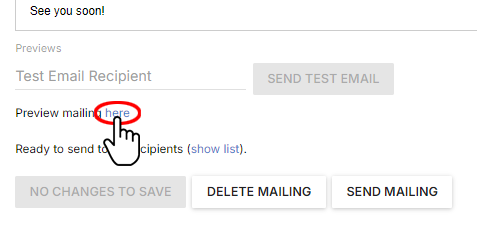
You can preview your mailings directly in the Eventive Dashboard by clicking "Preview mailing here".
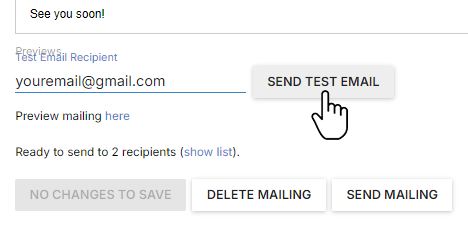
You also have the option to send a test email to an email address of your choice so that you can see what the email will look like in the inbox of your preferred email service or email client.
For more information on Mailings, please click here.
We've just deployed a fix to a known issue with Pass Rule Use Restrictions.
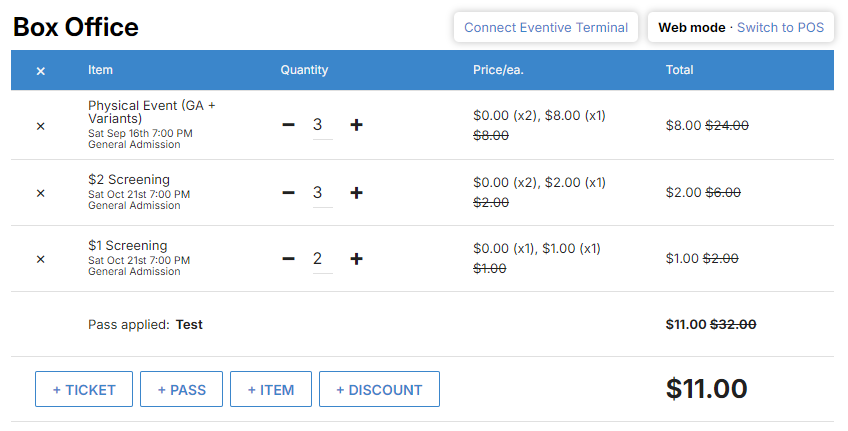
As some Eventive organizers had identified, the "Number of tickets per event per pass setting" had been allowing customers to exceed the "Total number of tickets per pass" when placing an order via the box office.
An example of this problem would be a 5 ticket bundle with a 2 ticket per event per pass restriction had been able to order up to 6 tickets, because the 2 ticket per event per pass restriction was unexpectedly being given priority over the total number of tickets per pass setting of 5.

This problem has now been fixed such that the both pass rule use restrictions are applied, but the Total number of tickets per pass are given priority over the Number of tickets per event per pass as expected.
improved
Labels for External Syncs
Are you making extensive use of the Mailchimp Sync and having difficulty telling all of your syncs apart?
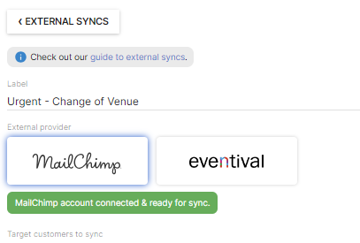
Now you can add a custom label to each of your External Syncs so that you can see at a glance what each sync is meant to do.
Name them by date, or by audience segment, or however you'd like.

When creating new syncs, the label field is right at the top of the page where you configure your external sync.
To add labels to existing syncs, click "Manage sync" next to the sync you would like to label.
Load More
→